The single decision that shapes a custom pencil order is not the color or the wording. It is the imprint method, because the method you choose sets a ceiling on how many colors you can run, how large the artwork can be, and which pencil shapes are even on the table. Get that one choice right and the rest of the specification falls into place. This walkthrough takes you through the four common ways a logo or message gets onto a wood pencil, and shows you how to write a spec a manufacturer can quote without a dozen follow-up emails.
Match the method to the pencil shape first
Pencil shape and imprint method are linked, so start with the physical pencil. A standard hexagonal pencil runs about 0.275 inches across the flats and 7.5 inches long; a round pencil is close in length but a touch fatter at roughly 0.284 inches in diameter. Carpenter pencils are a flat oval, around 0.3 by 0.55 inches and 7 inches long, while golf or bridge pencils are much shorter, at roughly 3 to 6 inches. Those numbers matter because a flat carpenter face and a curved round barrel present very different printing surfaces. Text-only logos sit comfortably on the flat facets of a hex pencil, whereas a wraparound photographic design needs a round barrel that a film can shrink onto evenly. If you already know the pencil style, tell the supplier up front, because it immediately narrows the sensible imprint options.
Foil stamping: one clean color, sized for text
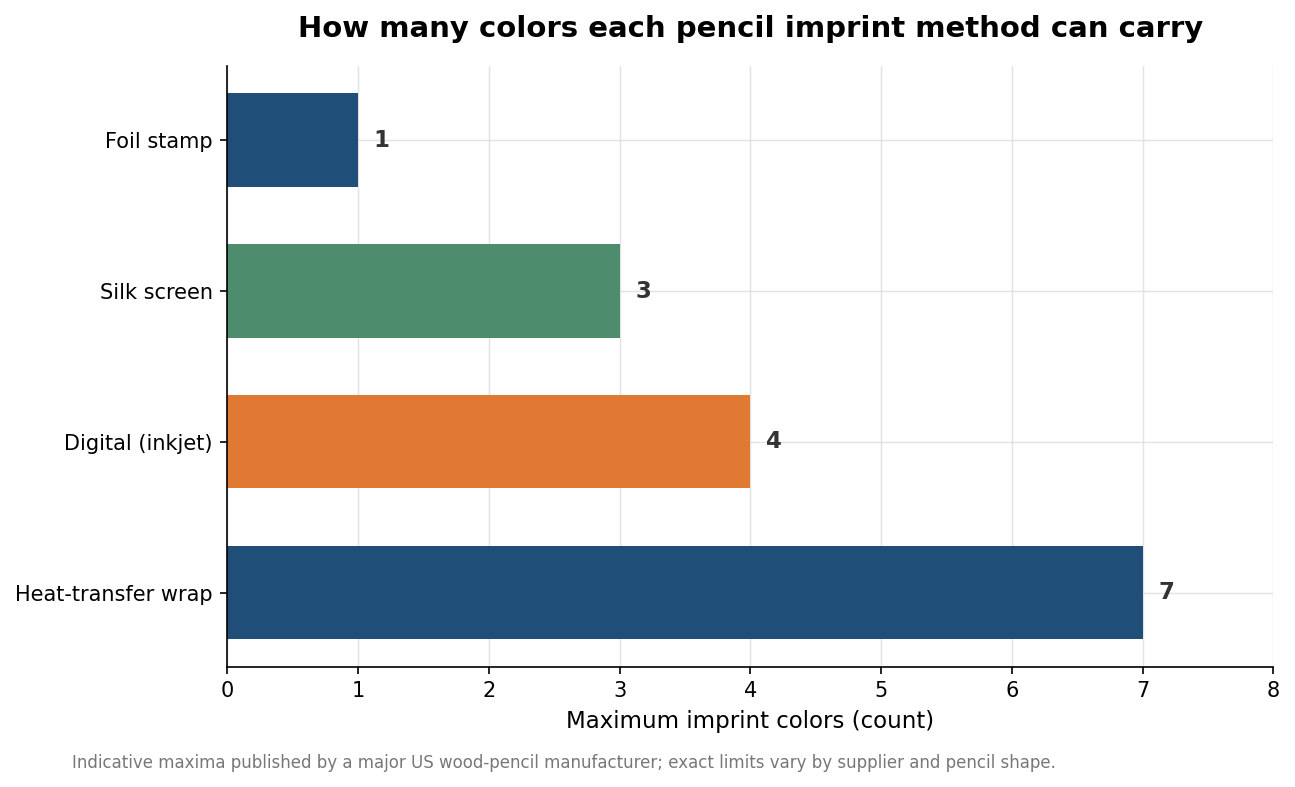
Foil stamping is the traditional pencil imprint, and it is still the right call for a lot of orders. A heated die presses colored foil directly into the wood, leaving a crisp, slightly recessed line. It is a one-color process, typically drawn from a set of around 22 stock foil colors including the familiar golds and silvers, and it excels at type and simple line marks rather than gradients or fine detail. Expect a modest one-time die charge, often in the range of $25 for a custom die, and be aware that many pencil makers set foil type in all capitals by default unless you supply your own artwork. If your job is a company name, a school, an event date, or a short slogan in a single color, foil is usually the cleanest and most economical route.
Screen, wrap, and digital: your multi-color options
When one color will not do, three methods open up more of the spectrum. Silk screening pushes ink through a fine mesh, one color at a time, and generally tops out around three colors because each color needs its own screen and its own setup, often about $25 per screen. It holds solid spot colors well, so it suits bold patterns and Pantone-matched brand marks on round pencils. Heat-transfer wraps print your design onto a thin film that is heated and shrunk around the barrel, which is how full-color and photographic artwork ends up on a pencil; depending on the process it can carry up to roughly seven colors, with CMYK digital matching commonly available on runs up to about 1,000 units. Digital inkjet is the newest option and is often tied to the wide, flat face of a carpenter pencil, handling up to about four colors for a small per-unit fee in the range of four cents a pencil. The chart below lays out the practical color ceiling for each method.
Design to the imprint window, not the whole pencil
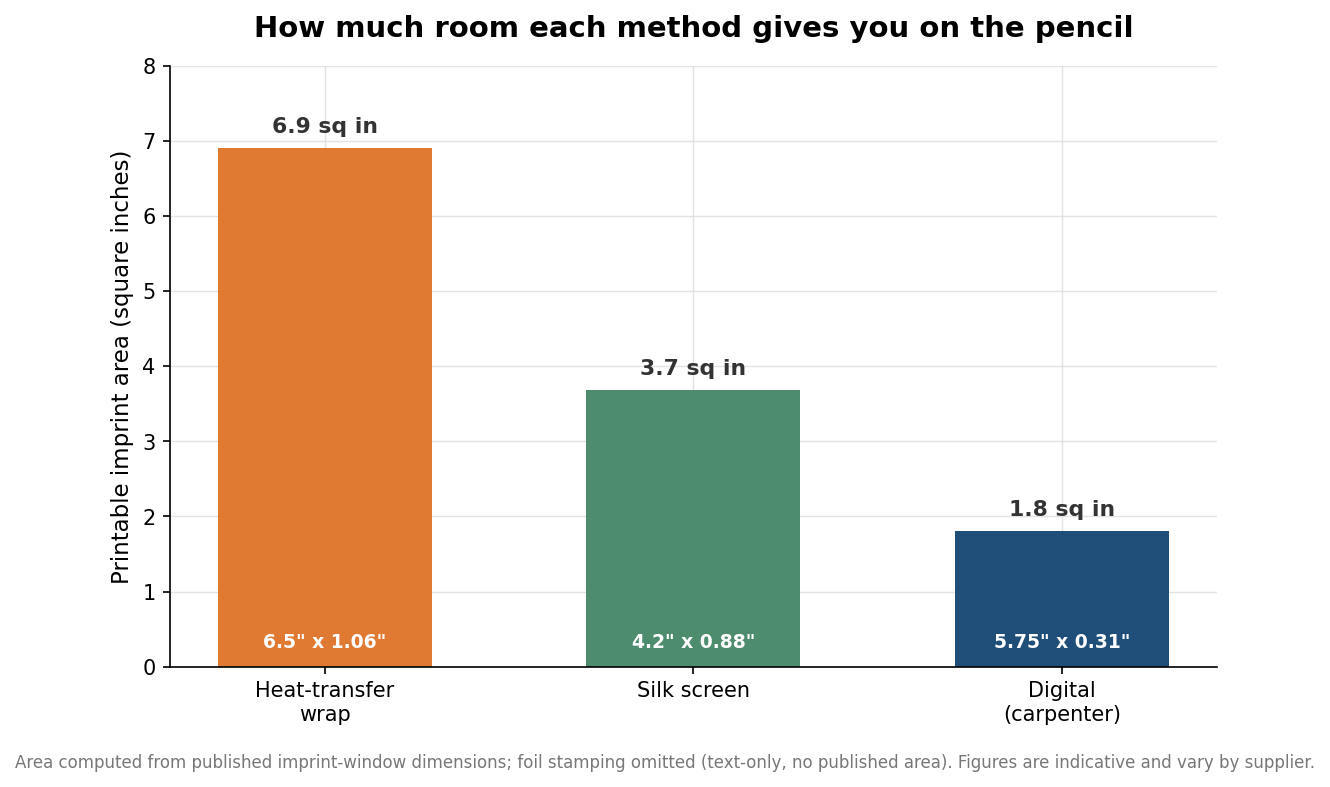
A pencil is long, but the printable window is smaller than people expect, and each method reserves a different footprint. Heat-transfer wraps give you the most room, with a typical window around 6.5 by just over 1 inch, which is why they carry the busiest artwork. Silk screening prints in a band closer to 4.2 by 0.875 inches, and the carpenter-pencil digital window is long but narrow at about 5.75 by 0.31 inches. Those differences change how a logo should be drawn: a mark that looks balanced in a square will get squeezed or cropped in a narrow strip. Build your artwork to the target window’s proportions, keep critical text away from the very ends where the ferrule and sharpened tip eat into the space, and remember that a wrap can run around the barrel while a foil or screen imprint sits on one face. The next chart compares the printable area you actually get to work with.
Files, colors, and proofs before the run
Once the method is set, the file requirements are straightforward but worth getting right the first time. Vector artwork in AI, EPS, or PDF format reproduces most reliably, since it scales to the tiny imprint window without going soft; raster logos should be high resolution at final size. Call out your colors explicitly with Pantone (PMS) references rather than leaving a screen or digital operator to guess, and specify whether type should be as-drawn or set in the supplier’s default caps. Ask for a proof, either a digital layout or a physical pre-production sample, before the full run, and confirm quantities against any method minimums; digital carpenter runs, for instance, often start around five gross, which is 720 pencils. The prices, imprint sizes, and color limits described here are indicative figures published by established wood-pencil manufacturers and will vary from supplier to supplier, so treat them as a planning baseline and confirm the exact specification on your quote. Do that, and you move from a vague idea to a printable order in a single, well-formed request.